
How to find the slope for a French drain.
How deep to dig your drainage system.
Please first read Steps 1 through 4 of our Drainage Guide
This page provides information on:
- Find the slope of your yard
- Properly slope the pipes in a French drain
- Determine how deep to dig the trenches
Now you are almost ready to do some digging, trenching, and pipe laying. But first you need to use your stakes and strings to figure out how deep you need to dig. To do this you will also need a line level, which is a little level available at any hardware store, that hangs on your string.
All of your drain pipe (with one exception) must slope slightly downhill. Usually 1/8" per foot is plenty for drainage, this is the same as the commonly recommended 1% slope. Note that I said the drain pipe must be sloped rather than the French drain. The reason for this is that the drain pipe is used to transport rain water to drier areas or eventually to an outlet, while the French drain is used to collect excess water from some areas and then disperse it into the subsoil in others. So it is not critical that the French drain trench bottom be perfectly sloped, it is great if you can manage it, but don't get too frustrated over it. The drainage pipe (or drain tile as some call it) will lay on a bed of gravel in the bottom of the trench and it is very easy to move this gravel around to properly slope the drain pipe.
So back to the stakes and strings. Starting at the most uphill point of your planned drainage system pound in a stake and tie off the string 6" above the ground. (Point J in the diagram below)
Stretch this string over to the stake at the next turn in your lawn drainage system. Note that you must ignore any short side branching pipes for now, see the example below.
With the string stretched along the first pipe run, hang the line level on the string, pull the string tight, and move the string up or down against this stake until the string is level. Mark this spot on the stake with a pencil or Sharpie. Keep the string pulled tight and tie it at the mark.
In most cases your mark will be more than 6" from ground level. If not, continue on anyways and it will probably work itself out. If you can not achieve a level string because the ground gets in the way then go back to the starting point and reposition the string's tie off point to 12" above ground level, then repeat the operation above.
Now you have a tight string that tells you the level position of your first pipe run. (Section J-K in the diagram) Next you will need a calculator and a tape measure. Measure the length of your string from stake to stake and round it to the nearest foot. On the example below this is 14 feet. Now divide the number by 8 to learn how much deeper one end of the pipe must be to achieve a slope of 1/8" per foot. 14 divided by 8 is 1.75 inches or 1-3/4 inches.
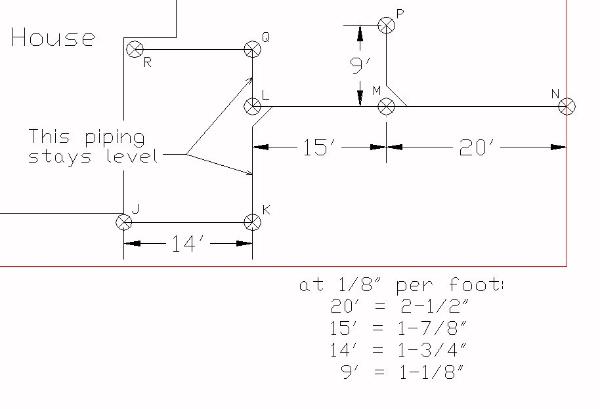
Make a new mark on the second stake this distance below the mark you recently made to show level. Now tie a new string at this new mark and stretch it to the next turn in your drain system, just like we did above. Make a mark where the string is level, like above, and tie the string at this mark.
Here we must deal with the one exception to sloping the pipe that I mentioned in the 2nd paragraph. On the example, the section K-L must be installed level (no slope) because it is a connector for two separate drain tiles. Anytime you end up with a piping system that looks like a dinner fork with 2 or more 'tines' connected to a 'handle' you should leave the cross pipe, the connector of the tines and handle, level.
Tie a new string at the level mark and stretch it to the next stake in the system and mark the level position. Again tie the strings off at level, measure the lengths, divide by 8 and mark the slope depths below the level mark. On our example shown below that means section L-M is sloped 15/8 = 1-7/8 inches.
Continue on repeating this procedure until you have reached the final end point of your drainage system, usually at the street or a ditch where the end of the drain pipe will be exposed.
By stretching these strings and marking the slope depths on your strings you have figured out how deep your drainage pipe must be, and how deep you must dig. Go to your final stake (at ditch, stream, or street) and measure up from the place where you want the bottom of your drain pipe to set up to the slope depth mark - write this number down. When draining into stream or ditch bank this is usually 6" below the neighboring ground level, when draining to the street this is either the top of the curb for yards with a steep slope near the curb or the bottom of the curb for gently sloped yards (cutting through the curb will be necessary here, and is difficult to do). In the example below, this distance is 60 inches (another reason to use long stakes).

This measured distance (60" in the example) tells you the distance form the bottom of the French drain to the lower string at each stake. If you subtract the distance from the ground to the lower string at each stake you can find the distance you must dig at each stake (24", 33", and 54" in our example).
Remember that a slope of 1/8" per foot is a minimum. In some cases you will want to increase the slope to avoid having to dig very deep French drains. In our example, the end of drainage system close to the house is 54" deep and we would like it to be shallower. If we want to dig only 20" deep near the house then move the upper string higher on the stake so the difference between the original depth and the desired depth (54"-20"=34"). Since the string was originally 6" off the ground it will now be 6"+34"=40" off the ground. Then when you measure down 60" from the string at the stake you get a trench depth of the desired 20 inches.
Now go back to the yard and find the slopes for the remaining side branches. Be aware the side branches will slope upward to the new points so that they drain into the main drainage pipe. In our example this means that branch M-P will be 1-1/8" higher at P, and branch L-Q will be level just like section L-K because it is a connector pipe. Section Q-R will be very steep just like section J-K to achieve a 20" trench depth at the house.
Once the French drain trenches and the drywells are dug, then the drywell fabric tubes are installed, the permeable landscape fabric is laid in the trench, and at least 2" of gravel is placed over the fabric (as described in French Drain Installation). This gravel can then easily be rearranged to obtain the proper slope for the rigid drainage pipe to be set in place (read here to learn why not to use flexible corrugated plastic pipe). Also you will want to read the page on how to select the proper fittings to allow your drainage system to be cleaned with common Roto-Rooter type equipment.
Our Articles about Drainage, Digging, and Trenching
