
Hand Digging
Dig by Hand: Why and how you should do it.
Author: Greg Baka

Whether you’re digging up a broken pipe, planting trees, or grading around your foundation, understanding the process of hand digging can save time and effort. This article explains why to dig manually, how to dig by hand, and the best digging tools for every situation.
Keep reading, or jump directly to these sections:
- Why to Dig by Hand Instead of Using Machinery
- How to Dig by Hand: A Two Step Process
- The Best Tools for Hand Digging
- Hand Trenching (a new guide)
Manual digging involves the use of human muscle to break up and move soil, gravel, or sand. It is done using a small assortment of specialized hand tools designed for different conditions.
Why to Dig by Hand Instead of Using Machinery
Manual digging is still essential for landscaping, gardening, construction, and excavating. Making a choice between using machinery versus hand digging depends for these three reasons:
- Size or scale of the project
- Accessibility to the area
- Precision and safety concerns
Size of the project
The size of the job is usually the primary deciding factor between digging by hand and digging with piece of powered machinery. Here are a couple examples of how the size or scale of the job lends itself best to manual or power digging:
- If planting 80 trees it would be worthwhile to use a skidsteer (Bobcat) or tractor with a powered auger attachment to quickly create all 80 holes. But if you are only planting one tree, it is much more cost efficient to just dig the single hole with hand tools.
- If digging the hole for an inground swimming pool, excavating machinery is definitely justified. But if digging a hole for a small plastic pre-formed garden pond, then manual digging makes more sense and will be less damaging to the yard.
- If digging the long wide excavations need for a large French Drain system (with gravel and piping) it's best to use a small backhoe. But if just burying extended downspout pipes at the corners of your home, then those are best dug by hand. See our extensive Drainage Guide for more information.
Accessibility to the area
Accessibility is often a factor in the choice between digging by hand and digging with machinery. If you can't safely get machinery into the work area, then you have to do manual digging instead. For example:
- Many backyards are not accessible by machinery without removing fences.
- Working in confined areas like basements and crawlspaces requires hand digging.
- Areas surrounded by trees or landscaping are often out of reach to powered machinery.
Precision and safety issues
Precision and safety are also factors that often influences the decision between digging by power or by hand. Machinery can't perform delicate operations, even when ran by an experienced operator. And powered machinery can be dangerous - both to people and to nearby structures and buried pipes and wires. Some examples include:
- Excavating pipes and power lines is best done with hand tools, and is often legally required.
- Digging next to building foundations to make repairs or do waterproofing is best done by hand to prevent scraping or impacting the foundation wall.
- Gaining access to buried structures like septic tanks or sump pits is best done by hand to prevent damage to those structures.
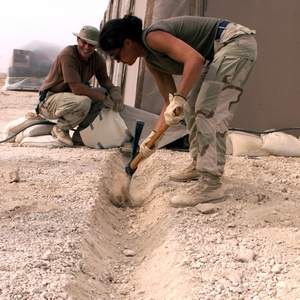
How to Dig by Hand: A Two Step Process
Manual digging is a two step process. The first step is to break up or loosen the soil, gravel, or sand. The second step is to move it, either vertically up into a pile or a wheelbarrow, or horizontally by scraping, raking, or tossing it to a nearby area.
These two steps or actions are different enough that they are usually done with separate tools.
Step 1: Breaking up or loosening the soil
- Slicing with a spade is done by pressing it into soil near the edge of of a previously dug or loosened area. You then pry that thin slice of soil forward or lift it upwards. These slices are repeated until the area is all loosened.
- Slicing with a mattock or grub hoe is done by chopping into soil near the edge of a previously dug or loosened area. You then pull the slice of soil towards you to crumble it. These slices are repeated until the area is loosened.
- Impacting is done with a tool like a pick, mattock, or digging bar. It works best on hard, dry, or compacted soil or soil mixed with a lot of gravel.
- Prying can loosen soil a bit deeper by stabbing a pick, digging bar, or spade deeply into the soil and then prying with the tool to raise and fracture the soil upwards.
Step 2: Moving the soil
- Lifting the soil up onto a pile or into a wheelbarrow is best done with a scoop shovel. The scoop shovel is more efficient and ergonomic because the angle between the handle and scoop is large (meaning the scoop shovel has a high lift) so the user doesn't have to bend over as far.
- Moving soil sideways is done by scraping, raking, or with a low spreading toss. Scraping is normally done with a wide hoe. Raking is normally done with a landscaping rake with short strong tines. Moving the soil with a low toss is done with a scoop shovel.
About roots, rocks, and mud...
Although hand digging sounds simple - just break it up and move it - it rarely works out that way.
Complications like roots, rocks, and mud pop up that require changes to the process. Below are tips
for dealing with these issues.
Also see our article
Digging in Soil with Roots and Rocks
- Roots get in the way, either large roots from a tree or masses of tangled roots from bushes. Large roots require either carefully digging around them to preserve the root or moving enough dirt away from them that you can cut them with a mattock, axe, saw, or loppers.
- Rocks, large or small, can cause a variety of headaches. Large rocks and stones normally need to be removed as it is very difficult to break or fracture partially buried rocks. So you have to dig out enough space around them to insert a pry bar or a pick and lever them out for removal.
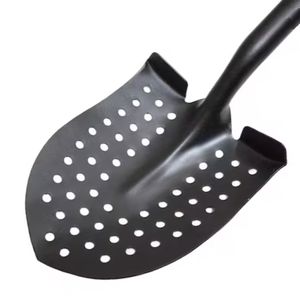
- Mud is best dealt with by waiting for it to dry. But if that is not an option, try either making the shovel as smooth and slick as possible so the mud slides off easily, or use a perforated mud shovel (or make your own). Sanding off any rust, repainting with high gloss paint, or coating the blade with lard or vegetable shortening will help the mud slide off easier. A mud shovel is just a combination shovel with about 50 small holes in the blade to break the vacuum that holds the mud to the blade. You can buy one, or just start drilling 3/8” holes in your shovel.
The Best Tools for Hand Digging
As we discussed earlier, the basic process of digging by hand is to loosen or break up the soil, then scoop it up or scrape it to a new location. But which tools you use for those tasks depends of the type of soil, the presence of rocks or roots, and whether you are lifting the soil upwards or scraping it sideways.
Before we “dig into” the specialty tools, let's talk about the most common digging tool...
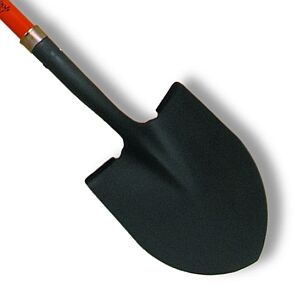
The common Combination Shovel may not be the best choice.
Although everybody has one in their garage, and they are widely used for both digging and scooping,
they are not very efficient for either task.
See our article about
Pros and Cons of a Combination Shovel:
- PRO - It is commonly available everywhere.
- PRO - It will handle most small digging projects.
- CON - It is not the most efficient design for either digging or for scooping.
- CON - It is a medium lift shovel. (see explanation of Lift below)
- CON - The inexpensive homeowner versions break easily.
Lift – How it relates to shovel efficiency
Lift is a measure of the angle between the handle and the blade of a spade or shovel. If you lay a shovel on the ground and press your foot down on the bottom edge of the blade, the distance that the top of the handle rises above the ground is the Lift.
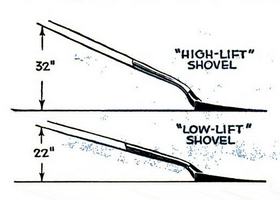
Spades have a low lift, which lets you hold the handle close to your chest while pushing the blade straight down into the soil. This makes them safer and more efficient for digging. But that same low lift makes them poor for scooping up loose soil because it forces you to bend way over to use them.
Scoop shovels have a high lift, which gives you a better straighter posture while scooping up loose material. This makes them more efficient and ergonomic for scooping. But the same high lift makes them awkward for digging into the soil because the handle angles far away from you when pressing the blade into the soil.
Why you should have one anyways.
If you can only get ONE digging tool, choose a combination shovel because it's the only tool that can both
break up soil AND scoop it up effectively. But like most multi-purpose tools, it's not super efficient at
either task, just adequate. If you're only going to digging for an hour it's fine, but if you're going to
be digging all day get the right collection of task-specific tools.
See the
Manual tools specifically for breaking up soil
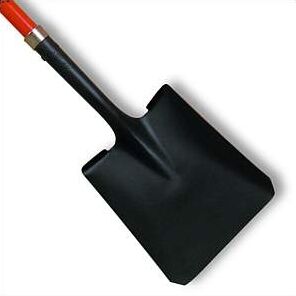
Digging Spade

- It can be used to cut a line through sod to separate the border between an area where is to be removed and the area where it should remain. A similar use is to clean up the border between a flower bed and the lawn.
- It can pierce deeply down into soil to loosen it for removal. This is best done like slicing bread. Make parallel slices a couple inches apart, and lever (tip) each slice forward a little to loosen it. This same basic process is done when double-digging a garden bed.
- When trenching, it can be used to vertically cut both sides of a trench. This allow the middle area to be broken up and scooped out, leaving straight vertical walls in the trench.
Grub Hoe or Digging Hoe
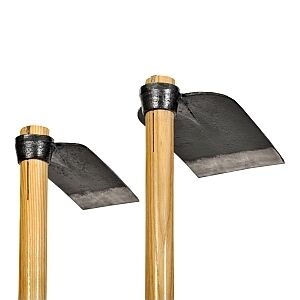
- It can be used to quickly loosen a large area of soil about 4 inches deep prior to moving it by scooping or scraping.
- In the garden it can replace a rototiller for tilling, breaking, and churning the topsoil.
- It can replace a powered trencher for short narrow utility trenches, like up to 50 feet long.
Pick and Mattock
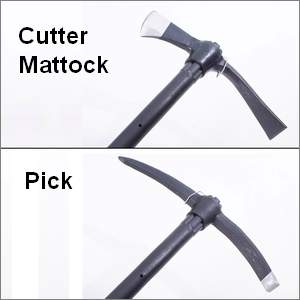
Here are the more common versions:
- Pick Mattock – one end is a long point for piercing hard soil and busting stones, while the opposite end is a short horizontal digging blade for chopping up soil.
- Cutter Mattock - one end is a vertical axe blade for chopping through roots, while the opposite end is a horizontal digging blade for chopping up soil.
- Pickaxe – this name is a little vague, but this tool is usually heavier than a mattock and either has pick points on both ends or a pick point on one end and a horizontal chisel blade about one inch wide on the opposite end. It is used for busting up rocks, stone, and really hard soil. It can also be used for prying out rocks.
- Railroad Pick or Clay Pick – this a lighter version of the pickaxe with a pick point on one end and a 1” horizontal chisel blade on the opposite end.
Digging Bars
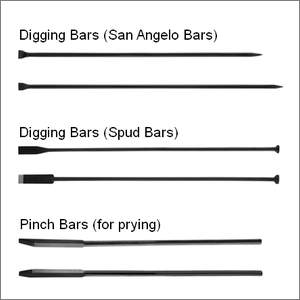
- San Angelo Bar – this type of digging bar has a tapered point on one end (like a pick point) and a narrow chisel blade on the opposite. It is used in hard soil that contains rocks and stones.
- Spud Bar – this type of digging bar has a wider longer digging blade on one end (like a mattock blade) and a circular tamper head on the opposite end. It is used for digging post holes and for cutting roots. The tamper end is for packing soil back in around fence posts.
- Pry Bar or Pinch Bar – this bar is heavier and hard to bend. It is only used for prying apart rocks or even concrete. It can also used to lift or tilt heavy crates or machinery up just far
Manual tools for moving loose soil
As previously mentioned, the “moving loose soil” portion of manual digging means either lifting it vertically onto a pile or into a container, or moving it horizontally by scraping, raking, or tossing. We will list the tools used for these tasks.
Scoop Shovel
- These shovels usually have a short handle with a D-grip. This allows more control when tossing the soil or tipping it onto a pile or into a wheelbarrow.
- True scoop shovels are only good moving loose soil, gravel, and sand. They are not good for digging, and do poorly at piercing into the side of a pile of loose soil.
- A round point shovel (combination shovel) is better at piercing into the side of a pile of loose soil, and okay at moving the soil gathered with each stab into the pile.
- See our article about Using Scoop Shovels on a Small Farm
Bow Rake, Landscaping Rake, or Garden Rake
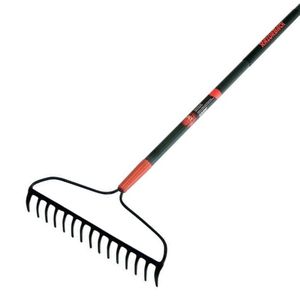
Because they are readily available, they do often get used. But they are not very efficient due to the soil, gravel, or sand passing through the gaps between the tines and being left behind. This requires re-raking the area multiple times to gather and move the bulk of the soil.
A better choice would be a tool like a garden rake, but with a solid blade instead of tines – which are described next.
Soil Scraping and Moving Tools with Solid Blades

One of these tools is called a Grape Hoe. It has a steel blade about 8 inches wide and a long sturdy handle. It does a good job of dragging soil along the ground, and can also cut off high spots in the area of loose soil you broke up with a different tool. As an added bonus, it is also a fast and efficient weeding tool for your garden.
Wider versions of these tools are called a Backfill Rake, a Concrete Rake, or a Concrete Placer. They have a steel or aluminum blade around 20 inches wide, and a long sturdy handle. The blades are about 6 inches tall and can drag a lot of soil because of their long width. Once the soil is moved, these special rakes are great at spreading and leveling the soil.
In closing, we hope this information about manual digging was useful, and that you found some new ideas for your next project. Before we wrap up, we wanted to share our article showing a variety of Storage Methods for Long Handled Tools so that you can keep digging tool collection safely organized.
Please do remember us for your next tool purchase.
Digging Tools sold by EasyDigging.com

Author: Greg Baka is the founder of EasyDigging.com
He is also an experienced gardener and home remodeling DIY'er. He has tackled everything from underground drainage to metal roofing, and all things in between. Using his engineering degree, he designed a variety of construction and excavating equipment.
Check out our Gardening and Digging Tools!
EasyDigging.com sells a variety of heavy-duty tools for gardening, landscaping, construction, and small-scale agriculture.
Just click one of the product types in the green menu above...▲
Check out our Gardening and Digging Tools!
EasyDigging.com sells a variety of heavy-duty tools for gardening, landscaping, construction, and small-scale agriculture.
Just click HERE to shoot back up to the top of the page, then open the "Product Menu" in the big green bar.
Connect with us!
![]()
![]()