
How to evaluate the results from the first partial Drainage System
Step 4
Please first read Steps 1 through 3 of our Drainage Guide
In Step 4 you will find information on:
- How to evaluate your drainage system design
- French drain and Drywell installation
- Installing plastic drainage pipe
In Step 3 - How to Diagram and Layout a Drainage System -
we planned a complete drainage system and decided which portion of it to install first. Trying a partial drainage system
installation first is part of the goal of eliminating the water drainage issues with the least cost and effort.
Below is the diagram of the portion we decided to install first...
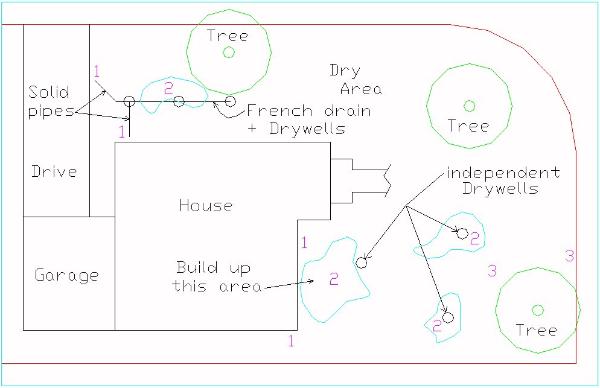
Results of the first partial drainage system
The next few rainstorms showed that the partial system in the side yard has eliminated the previous drainage problem in that area. This area can now be considered complete.
The front yard is a different story. Correcting the front foundation ground slope moved the previous Soggy Lawn Swamp forward enough that it connected up with a smaller swamp area. This is a partial success in that it moved the water away from the foundation.
There is also a partial success from the
independent drywells
in the front yard since one succeeded in eliminating a soggy lawn spot while the other two appear to be partially draining the
areas they reside in.
Below is the RESULTS of the first test...
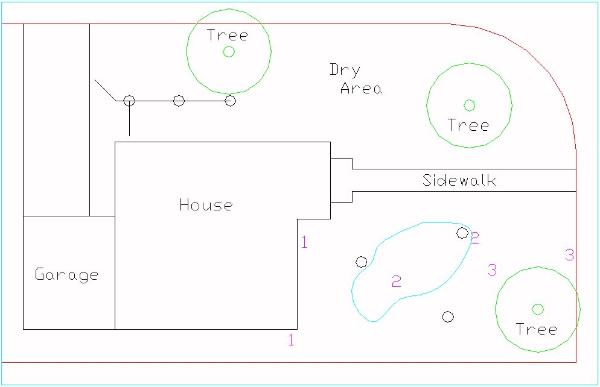
The fact that both front yard Lake Downspout issues, as well as the big Soggy Lawn Swamp and the Rainy River still occur, indicate a need for a complete drainage system to be installed in the front yard to handle the drainage problems there.
Plan for the final drainage system
Note that the pipes connecting to the downspouts
are solid pipe to move water far from the foundation before allowing it to soak into the French drain. Also
click to see the reason for the mixed 90 and 45 degree
fittings in the drain pipe system.
Below is the diagram of the final drainage system...
The French Drain does pass through the curb at the front of the property. This is called a "curb cut". This was necessary because there was no where else available to drain the stormwater to besides the street. Due to the multiple drywells, water should dump to the street only in very heavy rain conditions.
If you look close at the picture, you will see a very short 45 degree stub between the 2 and the 3. This is installed just in case you should later need to run a short length of French drain out to the lone drywell near the edge of the property.

So far we have gone through the process of determining your drainage problems, and planned a series of drainage systems to fix them, so let's get our hands dirty and do some digging!
Our Articles about Drainage, Digging, and Trenching
