
Cheap Deer Alarms for your Garden
Rat traps and percussion caps scare deer away with a BANG!
I saw this idea a few weeks ago on Doctor Dirt's Farm blog and really liked it. So I got hold of Peter (Dr. Dirt himself) and asked him to help me do an article on how to make these rat trap deer alarms. He liked the plan, so he built up a few more in his shop and photographed the process for us. This is a good gardening project for the frozen winter months.
Before we get started, please read this Warning:
Percussion caps are usually used to ignite muzzleloading rifles. These alarms use percussion caps to create a mild gunshot like bang, and they can be dangerous. Follow all the safety instructions provided with the caps. Do not use these alarms where children are present. Build and use these alarms at your own risk. You are solely responsible for your use of these instructions and any devices you create.
Thanks for reading! by Greg Baka

Rat-trap Deer Alarm Parts

Deer Alarm trigger assembly
Percussion caps and posts
Construction
Here are Peter's instructions for constructing his rat-trap deer alarm.
First - collect all materials listed below. A rat trap measures about 7" x 3.5" - do not get a smaller mousetrap. Be sure to buy Marine Goop because it is weatherproof and flexible enough to handle the impact forces. The steel strip can be bought at any hardware store and cut to length with a hacksaw.
- Rat trap
- Marine Goop (adhesive)
- 2 pieces of steel strip
- 1/8" thick x 1/2" wide
- 2 small screw eyes
- 2 #8-32 bolts 1-1/4" long
- stainless steel is best
- 2 #8-32 nuts
- 4 #8 flat washers
- #11 percussion caps
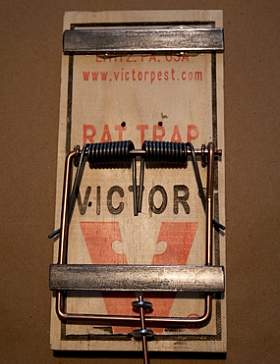
Second - remove the latch mechanism from the rat trap. See picture 2.
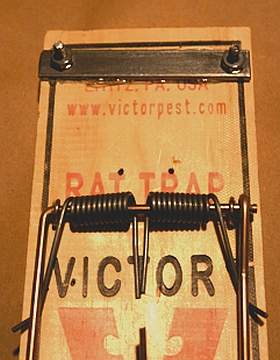
Third - cut a piece of the steel about 3.5" long and use the Marine Goop to glue it to the trap bar as shown in picture 3. Allow the glue time to fully harden.
2. Remove all the latch parts.
3. Goop steel strip to trap bar.
Fourth - pull the trap bar back to the "cocked" position and mark on either side of it for the screw eye locations. Use a very small drill bit to pre-drill holes for the screw eyes (to prevent splitting the wood) and apply a little Marine Goop to the threads before inserting the screw eyes. Take the original latch rod from the trap and cut it shorter to make the trigger wire. See picture 4.
Fifth - while the trap is shut, mark where the steel strip attached to the trap bar rests against the wood base of the trap. Then cock the trap and secure it with the trigger wire. Now use the Goop to fasten the second strip of steel in the location you marked. See picture 5. Allow the glue time to dry.
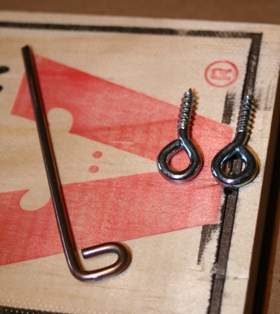
4. Trigger pin and screw eyes.
See assembled picture at top of page.
5. Goop the 2nd steel strip to the trap.
Sixth - drill two holes through the steel and the wood base that are big enough for the #8 bolts to slip through. Put one washer on each bolt and insert them from the bottom of the trap. Put a washer and then a nut on each bolt and tighten them. The percussion caps will fit onto the tops of these bolts. See picture 6.
Seventh - create a method of solidly attaching the alarm to something outdoors. It is best if the alarm sets mostly flat so the caps do not fall off or get rain under them. This can be done by drilling a few holes in the base to allow attaching it to a stump or fencepost. Or by adding a socket to the bottom that fits a steel rebar stake. A block of wood with a 9/16" hole drilled in it can be attached to the trap with Marine Goop, and this will fit a piece of 1/2" rebar very well. See the picture 7.
6. Bolts for holding the percussion caps.

7. Mounting block for rebar stakes.
Using the Deer Alarm
The basic operation is that a monofilament (clear) fishing line is tied to the trigger wire, then stretched 2 or 3 feet above the ground across an open area, and tied to a tree or fence post. When a deer walks into the area they contact the fishing line, push against it with their chest or legs, and cause the trigger wire to pull out of the deer alarm which releases it. The resulting BANG scares the deer into running away from the area.
Peter reports that "There is a deer highway along one side of my property with deer coming through almost every night. Since I started using the alarms I haven't had any browsing damage."
Here are a few other tips that Peter told me about in our messages and on his original blog post:
- The sound level is reasonable. Quieter than a .22, but louder than a hammer blow.
- Attach a "flag" to the string to let you know when the alarm has been tripped.
- After firing, the bolts should be brushed clean before adding new caps.
- Percussion caps do make a spark, so do not set the alarm in dry grass.
- The caps can be bought online or at a business that sells black powder firearms.
- Rebar stakes in moist soil may move too much. If so, tie them back to another stake.
Before we wrap up here, I just wanted to thank Peter one more time, and encourage you to check out his Dr. Dirt's Farm gardening blog.
MORE GARDENING ARTICLES
- Succesfully plant bare-root apple trees
- Make fruit juice without a squeezing press
- Machine picks up fallen apples for cider
- Hand-cranked Apple Peelers
- Cool Nutcrackers for Processing Nuts
- Compost Tractor: Old Piles to New Beds
- Planting and Growing Sweet Corn
- Seed-to-Soil Contact for Best Results
- Using a Jab Planter on a Small Farm
- How To Improve Clay Garden Soil
- Weed Control: False Seed Bed Method
- Make this Loud Deer Alarm to scare them away
- Beneficial and Harmful Garden Weeds
- Natural Weed Control Techniques
- DIY Test for Herbicide in your Compost
- Antique Tractors for Weeding Vegetables
- History of the Garden Broadfork
- How to use a Garden Spade
